This is the second part of the tutorial series How I work from home, in which I explain how to access your data remotely via different ways. In this part, I talk about remote data analysis using the excellent Jupyter Notebook environment.
Part 2 - Table of Contents
Remote data analysis with Jupyter Notebook
You can use the methods listed in pt. 1 to access any files you want remotely, but in the end it will incur downloading something. If you simply intend to analyse the data (interactively or not), you might just want to run the analysis remotely as well. You won’t have to download anything, and the pipeline will have faster access to the files.
Notice: Take into account that the data processing will run on the remote computer. If this is a shared computer and you run numerically intensive processes, all the other users will notice the performance loss. In that case, consider scripting the interactive analysis in an automated way so you can submit it to a calculation node.
01: Install Jupyter Notebook
Jupyter Notebooks are language-agnostic documents composed of cells that allow you to run code interactively while documenting the process. They were created for Python (IPython era) but now admit more languages (Julia, R, Scala…). Behind the scenes, they are JSON files that are rendered by a web application. This means that you access them through the browser, which is perfect for remote access. I mean, that’s what browsers were designed for!
Since I mostly use Python for data analysis, I will install Jupyter along a Python environment with conda. conda is the package manager of the Anaconda Python distribution for data science, freely available. Anaconda is distributed in two flavours:
- Anaconda Distribution: The full pack with hundreds of packages for data science, Jupyter included.
- Miniconda: A stripped down version with only the basics (Python + conda, mainly), which you can then use to install what you want.
I normally prefer a smaller installation size, so choose Miniconda and then install Jupyter in the REMOTE computer. You don’t need it locally (you will just connect to a webserver). Instructions for Miniconda:
# Connect to remote PC (jump through BASTION if necessary, see part 1)
[henry@home] $ ssh robert@remote.example.org
# Download Miniconda Python 3.7 for Linux 64bit
[robert@remote] $ wget https://repo.anaconda.com/miniconda/Miniconda3-latest-Linux-x86_64.sh
# Install Miniconda
[robert@remote] $ bash Miniconda*.sh
# Configure .bashrc
# If present, remove the PATH modification line added by the Miniconda installer
[robert@remote] $ echo ". ~/miniconda3/etc/profile.d/conda.sh" >> ~/.bashrc
[robert@remote] $ source ~/.bashrc
# Activate conda base environment and install Jupyter
[robert@remote] $ conda activate
[robert@remote] $ conda install jupyter notebook ipython
Now, you can run Jupyter Notebook in the remote PC. Use the --no-browser flag to skip the automatic $BROWSER launch.
# If not already activated
[robert@remote] $ conda activate
# Run Jupyter server
[robert@remote] $ jupyter notebook --no-browser
You will see something like this in the output:
[I 16:43:24.055 NotebookApp] Serving notebooks from local directory: /home/user/data
[I 16:43:24.056 NotebookApp] The Jupyter Notebook is running at:
[I 16:43:24.056 NotebookApp] http://localhost:8888/?token=fbccf41667a91f907253cb653654651356623741d947
[I 16:43:24.056 NotebookApp] Use Control-C to stop this server and shut down all kernels (twice to skip confirmation).
[C 16:43:24.056 NotebookApp]

    Copy/paste this URL into your browser when you connect for the first time,
    to login with a token:
        http://localhost:8888/?token=fbccf41667a91f907253cb653654651356623741d947
If you Ctrl+Click on that URL now, a new tab will open in the browser, but it will fail to connect. We have to fix that by forwarding the connection to our home PC.
You need to keep this process running, so don’t close the ssh connection! If you really need to do that, consider using screen or tmux to create a virtual session before launching the Jupyter server. Remember to copy the token code in that case!
[robert@remote] $ screen -R notebook
[robert@remote+screen] $ conda activate
[robert@remote+screen] $ jupyter notebook --no-browser
# <Ctrl+A><D> to exit screen and leave it running
# Re-enter screen with: screen -R notebook
02: Forward the server connection
At this point, the Jupyter server will be running, but we cannot access it from our home PC. We need to forward the remote IP and port (8888 by default) to our localhost address with SSH tunneling, aka the -Nfl combo.
If you have direct access to the remote PC running the Jupyter server, it is easy. We will use the same port at both sides for simplicity:
[henry@home] $ ssh -NfL 8888:localhost:8888 robert@remote.example.orgIf you have to jump through a bastion server, you can use -J like before and it will behave as expected:
[henry@home] $ ssh -J bianca@bastion.example.org:22522 -NfL 8888:localhost:8888 robert@remote.example.orgWithout -J (older OpenSSH builds), you can do it with two forwardings:
# First connection let us bypass the bastion
[henry@home] $ ssh -NfL 2222:remote.example.org:22 bianca@bastion.example.org -p 22522
# We can now access REMOTE through localhost at port 2222!
# Bind the remote 8888 to our local 8888.
# Notice how the username matches REMOTE, not HOME
[henry@home] $ ssh -NfL 8888:localhost:8888 -p 2222 robert@localhost
03: Connect!
If the 2nd step was successful, you can now open a new tab in your browser and enter http://localhost:8888. It will ask for the token from step 1. In fact, you can also Ctrl+Click in that link (http://localhost:8888/?token=fbccf41667a91f907253cb653654651356623741d947) to open the webapp directly in your local browser. It will correctly load now!
You can create a new Notebook by using the New dropdown menu in the top right corner and begin your data analysis. You will be able to type your code without lag because the commands will only be sent to the remote PC when you execute the cell (Ctrl+Enter or Shift+Enter).
04: Additional benefits of the Notebook environment
The Notebook environment can assist your remote work in more ways than interactive analysis:
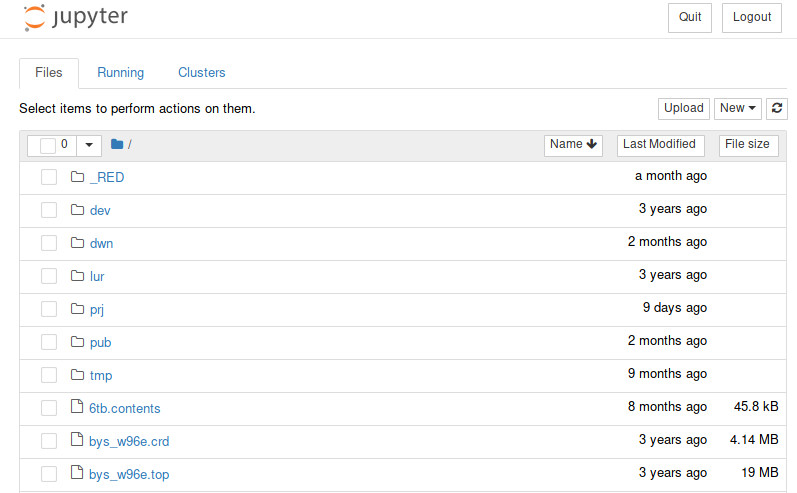
Explore and view your files
The Notebook web-app provides a tree view for all the directories and files listed under the working directory. This is the first thing you see when you connect to the server. So if you ran jupyter notebook from ~/Documents, the dashboard will list everything under ~/Documents/*.
From this view you can also:
- Edit text files: The builtin editor supports syntax highlighting, shortcuts…
- View/download other files: If your browser natively supports the format (images, PDF documents…), you will preview it. Otherwise, it will be downloaded.
- Create, copy, rename and delete generic directories and files
- Manage running notebooks: Pause, resume and stop them, even several ones at the same time.
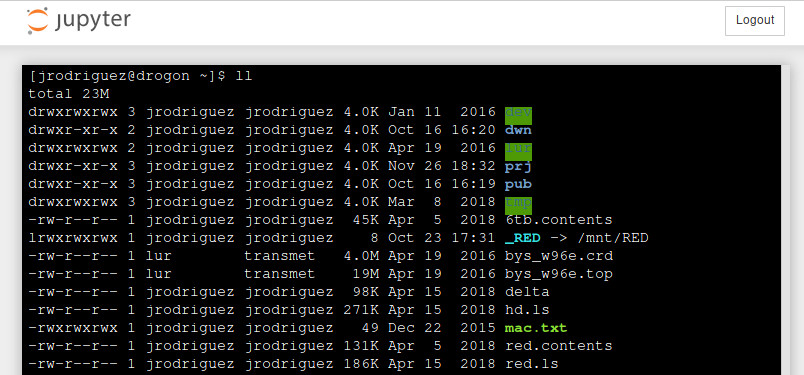
Execute shell code
You might already know that, inside a notebook, you can prepend an exclamation mark before the shell command (!ls -alh), and when you execute the cell that command will be run in a subprocess. The stdout results will appear as the results of the cell. You can even save them to a Python variable: directories = !ls -1 */
A little lesser known feature is the possibility of launching a full terminal in your browser. From the New dropdown in the dashboard, choose Terminal and you will get a new tab with an interactive shell console:
Wrapping up
That’s all for now. Jupyter can really accelerate your analysis workflows in the way to automating everything. However, there are areas where a graphical interface is needed no matter what… Check the third part to learn how to do that on remote!
All parts